

Planning shipping container tiny home utilities is less about choosing one appliance or pipe and more about coordinating every system before the walls, floor, and ceiling are closed. Power, water, wastewater, heating, cooling, ventilation, and insulation all compete for limited space. A clear utility plan helps you find conflicts early, protect the steel shell, and decide which work belongs with licensed professionals.
What should a utility plan include before conversion work starts?
A useful utility plan shows where each service enters the container, where equipment will sit, how lines travel, and where future access remains available. It should coordinate the floor plan, openings, wet areas, electrical loads, HVAC equipment, insulation thickness, drainage, delivery placement, and local approvals before anyone cuts the steel.
Start with a scaled drawing of the container and mark the intended use of each area. A bathroom, kitchen, laundry area, mechanical closet, sleeping area, and living space each create different utility demands. Then add the doors, windows, appliances, water heater, electrical panel, HVAC equipment, ventilation points, shutoffs, cleanouts, and access panels.
Mark the main power entry, service equipment, panel, outlets, lighting, and dedicated loads.
Mark the water entry, hot and cold supply paths, fixture locations, shutoffs, and freeze-sensitive sections.
Mark drains, traps, vents, cleanouts, wastewater exits, and the intended connection to sewer, septic, or another approved system.
Mark heating and cooling equipment, line sets or ducts, condensate management, and fresh-air or exhaust paths.
Mark insulation and air-sealing assemblies so the utility routes do not create cold surfaces or unsealed penetrations.
Mark every planned wall, roof, and floor penetration, including sleeves, protection, flashing, and service access.
Review the drawing as one system rather than as separate trade sketches. A drain route can compete with an electrical run. A thick wall assembly can change outlet boxes and trim dimensions. A mini-split line set can affect a cabinet or window location. The earlier those conflicts appear on paper, the less likely they are to become expensive changes inside a finished container.
How do you coordinate power, water, and wastewater?
Power, water, and wastewater should be planned together because they share entry points, walls, floor space, and service clearances. The right arrangement depends on the site, the intended occupancy, the available utility connections, and the final plans approved by qualified professionals and local authorities.
First, identify the property-side connection points. A project may involve a utility service, an underground feeder, a private well, a public water connection, a septic system, a sewer lateral, or another permitted arrangement. Do not assume a container can be placed first and connected later. The distance to each connection affects trenching, routing, drainage, protection, and the location of penetrations.
Next, group compatible fixtures. Keeping the kitchen, bathroom, laundry, and water-heating equipment near one another can shorten supply and drain runs. It can also simplify access and reduce the number of walls that need to carry wet plumbing. That does not remove the need for correct venting, drainage, clearances, or local review, but it gives the design a more manageable starting point.
Electrical planning starts with a complete load list. Include lighting, general outlets, cooking equipment, refrigeration, water heating, HVAC, laundry, pumps, exterior equipment, and any future loads. A qualified electrician should use that list to determine service, feeder, panel, breaker, grounding, bonding, and protection requirements. The container's metal shell also needs to be addressed as part of the grounding and bonding design.
Water and wastewater planning should identify every fixture and every point where a line changes direction or passes through the steel. Keep shutoff valves, cleanouts, and access panels reachable after cabinets and finishes are installed. Drainage requires a deliberate route and the appropriate fall, venting, traps, support, and protection under the applicable plumbing rules. A licensed plumber should finalize the design and connections.
System | Plan early | Verify before closing walls | Final review |
Electrical | Loads, panel, feeder route, outlets, lighting, and equipment locations | Clearances, conductor protection, grounding, bonding, and penetrations | Licensed electrician and local inspection process |
Water supply | Entry point, wet core, water heater, fixture runs, and freeze protection | Supports, shutoffs, insulation, sleeves, and leak access | Licensed plumber and utility or health authority requirements |
Wastewater | Fixture layout, drain path, vents, cleanouts, and property connection | Drain fall, supports, traps, sealing, and service access | Licensed plumber and local sewer or septic approvals |
For more detail on one part of the plan, use Mann's Cans' shipping container plumbing guide for fixture and drainage considerations and the shipping container electrical wiring guide for load planning and professional electrical review. This article's role is to connect those systems at the planning stage.
Where should utility lines run inside a shipping container?
Most utility routes work best when they are concentrated in planned framed walls, a raised floor, a ceiling service zone, or a dedicated chase. The best choice depends on the container's size, finished ceiling height, foundation, climate, access points, and the line sizes required by the final design.
A shared utility wall can carry several related services while keeping the opposite wall available for furniture, windows, or circulation. A wet core can keep supply and drainage close to the kitchen and bathroom. A mechanical closet can provide service access without placing equipment in a narrow hallway. These are planning patterns, not universal solutions, so the finished route must be checked against the selected equipment and local requirements.
Protect every line that passes near or through steel. Use an appropriate sleeve, bushing, grommet, seal, or other protection specified by the responsible trade. Sharp edges, movement, moisture, and condensation can damage wiring or piping over time. Penetrations also need a durable weather and air-sealing strategy that is compatible with the wall assembly and exterior finish.
Avoid burying important components behind permanent finishes. Keep panel doors, valves, filters, cleanouts, condensate controls, equipment disconnects, and inspection points accessible. Labeling can help the future owner, but labels should supplement a clear plan rather than replace one. Photograph the rough-in before insulation and drywall so future repairs do not depend on guesswork.
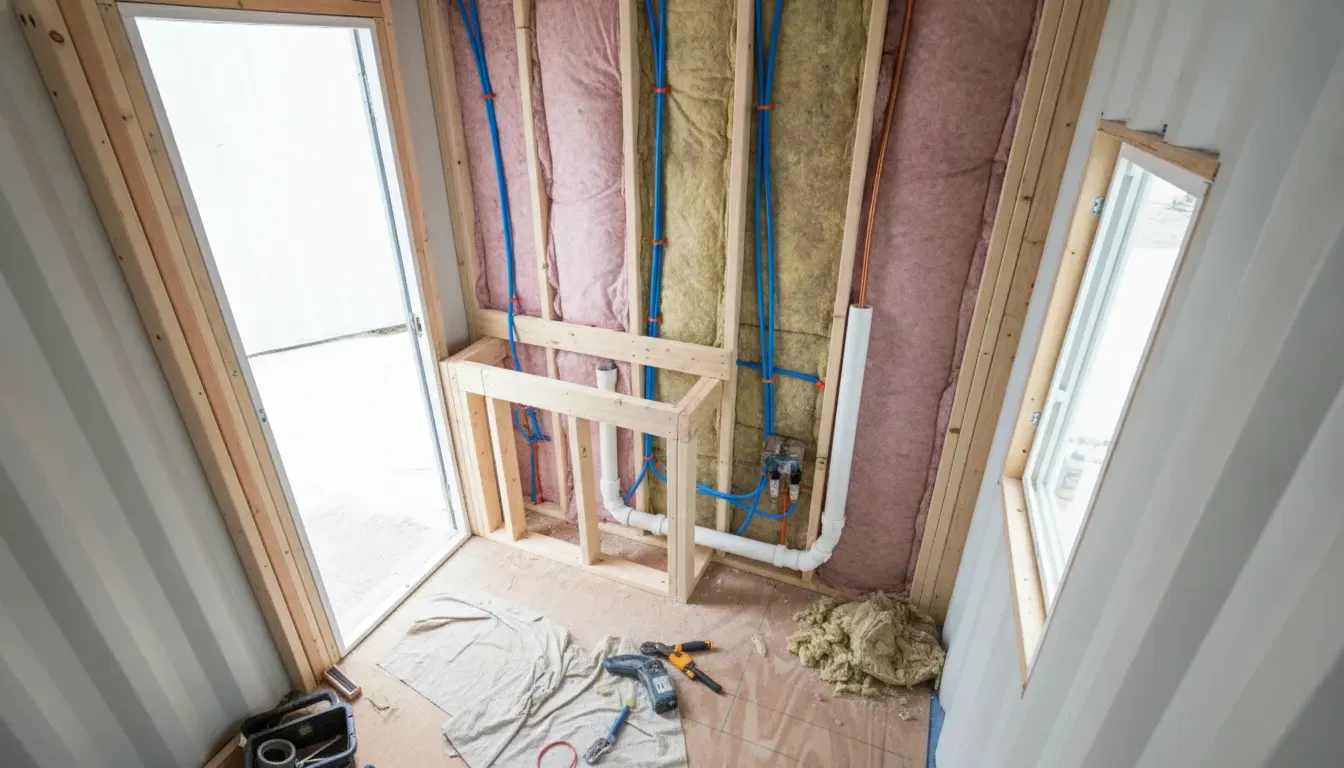
Utility chases and framed walls help keep water, drainage, wiring, and insulation coordinated before finishes are installed.
Do not route lines directly against a cold steel shell without considering condensation and freeze risk. Keep temperature-sensitive systems inside the conditioned envelope where the design allows. If a line must cross an unconditioned area, the responsible professional should specify protection, insulation, heat tracing, drainage, or another suitable method. Pennsylvania winters make this review especially important for container projects in the Pittsburgh area.
How do insulation, HVAC, and ventilation work together?
In a container tiny home, insulation, heating, cooling, air sealing, and ventilation form one comfort and moisture-control system. A heating or cooling unit cannot compensate for an unplanned envelope, and a sealed envelope still needs a deliberate way to manage indoor air quality and moisture.
The metal shell transfers outdoor temperature quickly compared with a conventional framed wall. The wall, roof, and floor assemblies therefore need to be selected as a coordinated package. Leave room for the intended insulation, framing, wiring, plumbing, finishes, and required clearances. Do not choose an insulation thickness first and discover later that it leaves no space for outlets, pipes, or equipment access.
HVAC equipment should be sized from the actual enclosure, climate, windows, occupancy, and internal loads. A ductless mini-split may fit many compact layouts, but its location, line-set route, condensate disposal, electrical load, outdoor-unit clearance, and service access still require design. A ducted system may be appropriate in another layout. The correct equipment is the one that can serve the finished space safely and effectively, not simply the smallest unit that fits.
Ventilation also needs a place in the plan. Kitchen exhaust, bathroom exhaust, fresh-air supply, and whole-home ventilation can require separate routes and exterior terminations. Do not place exhaust where it can return through a window, door, or intake. Coordinate fans and ducts with insulation and air sealing so the penetrations do not become moisture or comfort problems.
Mann's Cans has separate resources on shipping container HVAC in Pennsylvania, active and passive container ventilation, and spray foam shipping container insulation. Read those guides for system-specific decisions, then bring the selected requirements back into the shared utility drawing.
What order should utility work follow?
A practical sequence is to finalize the layout and site assumptions first, then complete structural modifications and framing, followed by plumbing and HVAC rough-ins, electrical rough-in, insulation and air sealing, finishes, equipment installation, and final testing. The exact order can change by project, but every trade should know the sequence before work begins.
- Confirm the site and use.
Check delivery access, foundation or supports, grading, drainage, overhead hazards, intended occupancy, and property-side utility locations.
- Freeze the room and equipment layout.
Confirm the container size, doors, windows, wet core, appliances, water heater, panel, HVAC equipment, ventilation points, and service clearances.
- Review approvals and professional designs.
Ask the municipality and utility providers what applications, inspections, engineered details, and trade permits apply to the project.
- Complete structural openings and framing.
Finish approved cuts, reinforcement, window and door work, chases, equipment supports, and the framing needed for the finished assemblies.
- Install plumbing and HVAC rough-ins.
Set drains, vents, supply lines, line sets, ducts, condensate paths, and access points while routes are visible.
- Install electrical rough-in.
Route approved wiring and conduit, install boxes, plan the panel and disconnects, and coordinate grounding and bonding with the responsible electrician.
- Inspect and document.
Photograph routes, test accessible systems, correct conflicts, and complete required inspections before covering work.
- Close the envelope and finish.
Install insulation, air sealing, interior finishes, fixtures, equipment, and trim without blocking the access points reserved in the plan.
- Commission the finished space.
Confirm equipment operation, water flow, drainage, ventilation, temperature control, electrical protection, leak checks, and owner instructions.
Putting electrical work last is not a rule for every project. The key is coordination. In some builds, electricians need to rough in before a mechanical system is set. In others, structural or manufacturer requirements change the sequence. The lead contractor and licensed trades should agree on the order that protects the work and supports the required inspections.
Need help thinking through a container conversion? Contact Mann's Cans to discuss the project scope.
What should be checked at the site before utilities are designed?
Site conditions can determine whether a utility plan is practical before the container ever arrives. Confirm the proposed placement, finished floor height, access for delivery, foundation or support method, drainage, utility distances, overhead clearances, and the route for trenches or service connections.
- Delivery and placement:
Confirm truck access, turning space, overhead lines, the unloading method, and the final orientation of doors and service sides.
- Foundation and level:
Use the foundation or support design required for the site and project, with a level finished container position that supports door operation and drainage planning.
- Water and wastewater:
Identify connection points, expected route lengths, elevation changes, shutoffs, cleanouts, and whether sewer, septic, or another approved arrangement is available.
- Electrical service:
Confirm the utility service location, service capacity, feeder route, trenching needs, panel position, and equipment clearances with the electrician and utility provider.
- Weather exposure:
Consider shade, solar gain, wind, snow, rain, outdoor HVAC placement, condensation, and the protection of exposed pipes or equipment.
- Local approvals:
Ask the township, borough, or city how the proposed use is classified and which zoning, building, utility, plumbing, mechanical, and electrical reviews apply.
For Pennsylvania projects, requirements can vary by municipality and by whether the container is treated as a dwelling, accessory dwelling unit, or another structure. Mann's Cans' guide to shipping container tiny home regulations in Pennsylvania explains why local confirmation matters. It is a planning resource, not a substitute for the authority having jurisdiction or a licensed designer.
What are the most common utility planning mistakes?
The most common mistakes happen when a project treats the container as an empty box instead of a compact building system. A route that looks simple before framing can become inaccessible after insulation, cabinetry, finishes, and equipment are installed.
- Choosing equipment before confirming the layout:
A water heater, panel, HVAC unit, or vent may consume space needed for circulation or service access.
- Placing wet rooms too far apart:
Long supply and drain routes increase coordination, access, and freeze-protection challenges.
- Cutting the steel without a complete penetration plan:
Openings can affect structure, weather sealing, corrosion protection, insulation, and the route of future services.
- Leaving no service access:
Valves, filters, cleanouts, disconnects, and equipment that cannot be reached become future demolition projects.
- Ignoring condensate and drainage:
HVAC condensate, plumbing leaks, roof runoff, and ground moisture all need a planned path away from finished spaces.
- Using the wall cavity as an unplanned utility chase:
The available space may not fit pipes, wiring, insulation, fire stopping, and finish materials together.
- Assuming local approval is uniform:
Requirements can change by municipality, property, use, and connection type.
- Closing walls before inspections and documentation:
Covering rough-ins too early can hide defects and make required review more difficult.
These risks are why a professional conversion discussion should happen before a container is modified. Mann's Cans provides custom shipping container solutions for residential and commercial applications, while licensed trade professionals handle the designs and connections that require their credentials.
How can a homeowner prepare for a utilities consultation?
Bring a concise project brief to the first conversation. Include the container size or preferred options, intended use, number of occupants, room list, appliance list, site address or municipality, foundation assumptions, desired utility connections, delivery constraints, and any drawings or photos of the property.
It also helps to separate decisions into three lists:
- Known:
the intended location, available services, desired rooms, preferred container size, and confirmed site constraints.
- To verify:
local classification, permits, service capacity, septic or sewer feasibility, drainage, equipment sizing, and structural requirements.
- Open choices:
water-heating approach, HVAC format, ventilation strategy, interior finish depth, storage layout, and future expansion.
Use a shipping container house plan as a coordination document, not as a final stamped design. A good plan makes questions visible. It does not grant permission to connect utilities or replace the licensed professionals responsible for the work.
Frequently Asked Questions
Can a shipping container be converted into a tiny home with utilities?
Yes, a shipping container can be planned for residential-style power, water, wastewater, heating, cooling, and ventilation. The conversion requires a coordinated design, suitable site, approved connections, structural review where needed, local approvals, and licensed professionals for trade work that requires credentials.
Where should plumbing and electrical lines run in a container tiny home?
Routes commonly run through planned framed walls, a service chase, a raised floor, or another protected zone. The best choice depends on the layout, insulation, equipment, foundation, and local requirements. Keep critical shutoffs, cleanouts, panels, and equipment access points reachable after finishing.
What kind of HVAC is best for a shipping container tiny home?
There is no single best HVAC system for every container. A ductless mini-split may fit a compact layout, while another design may need a different approach. Equipment should be selected and sized from the finished enclosure, climate, loads, ventilation needs, clearances, and service access.
How do you keep pipes from freezing in a container home?
Plan temperature-sensitive pipes inside the conditioned envelope when possible, protect penetrations, coordinate insulation and air sealing, and address any unconditioned routes with the responsible plumbing professional. The correct freeze-protection method depends on the climate, pipe location, water system, and applicable code.
Does a container tiny home need permits for utilities?
Often, utility work and a habitable container conversion involve local review, but the exact requirements vary by municipality, property, use, foundation, and connection type. Ask the local zoning and building officials which approvals apply, then have licensed trades and qualified designers prepare the required details.
When should utility planning begin?
Begin before purchasing or modifying the container. Utility entry points, wet-room locations, panel and equipment clearances, insulation depth, structural openings, delivery orientation, and local approvals can all change the design. Early coordination is easier and less expensive than relocating a line after finishes are installed.


Comments